When I joined Deutsche Telekom 2 years ago, I had to share a common reference test system with everyone in the rooms, including all operators and developers. This was quite troublesomes when you have new ideas to test without interfering anyone, also make sure that your experiments will not break things down and make your colleagues angry.
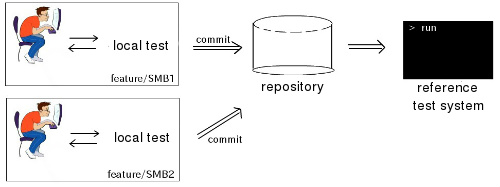 Figure1: a local integration test for experiment on new features
Like any development process, a local integration test system is required. It must support developers editing and debugging OpenStack on the fly, as well as operators or package-manager testing a release. It’s also nice to reset the test system from dirty changes and provision it again as fast as possible. This post introduces such system and now available upstream on our repository.
1. Overview
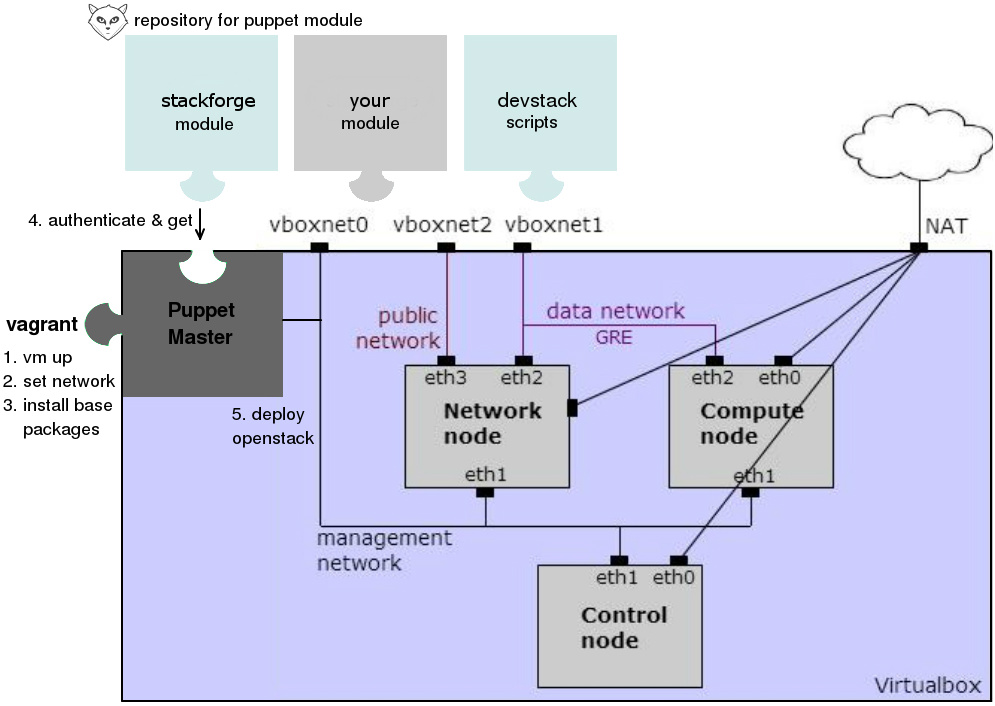 Figure 2: deployment of OpenStack by vagrant
Vagrant is responsible for bringing the VMs up (step 1), setting up host-only networks within Virtual Box (step 2) and install base packages. From now on there are two ways to deploy OpenStack depends on your needs (step 5). For development purpose, OpenStack is deployed by devstack. For testing release packages, puppet is in use. The two deployments are configurable in a global file. Their git modules are authenticated (in case your company requires ssl for connection) and drop-in the vm for deployment (step 4).
From my personal use case, I always need to switch between the 2 deployments: devstack for coding and puppet for testing packages. Switching between the two is also supported to keep the previous deployment save, separated and reuse.
    # set environment in config.file, i.e puppet or devstack:
    env: puppet
1.1 Networking
Back to that time I only found projects that deploy all OpenStack components in one VM. This does not satisfy our needs because the all-in-one deployment does not reflect the behavior of the GRE data network within different OpenStack components. Figure 2 above shows multi nodes: control, compute and neutron node along with the 3 host-only networks for management, data GRE, and public network are brought up automatically.
    # supports multi nodes to enable/disable
    $ vagrant status
    Cache enabled: /home/tri/git/vagrant_openstack/cache
    Working on environment deployed by puppet branch icehouse...
    compute2.pp               disabled in config.yaml
    neutron2.pp               disabled in config.yaml
    Current machine states:
    puppet                    not created (virtualbox)
    control.pp                not created (virtualbox)
    compute1.pp               not created (virtualbox)
    neutron1.pp               not created (virtualbox)
In such testing environment, we also need to test the floating ips of the VMs over the public network, because it would be extremely boring if the nova booting VMs cannot connect to the Internet. For this reason, figure 3 shows how packages from inside the neutron node go out and back. Packages coming from br-tun, br-int, go to br-ex on neutron node, are forwarded to the NAT interface (vboxnet0) and SNATed so that they can find the way to go back.
 Figure 3: SNAT for testing floating ips
1.2 Storage
For a simple nova volume setup, iSCSI is chosen by default. The VBoxManage command [3] is very useful in this case for our vagrant to create a virtual storage and attach to control node. For those who interests in coding, the VBoxManage command is as follows
    # create virtual storage
    VBoxManage createhd --filename <vdi> --size <cinder_storage_size>
    # and attach it to a vm
    VBoxManage storageattach <vm_id> --storagectl "SATA Controller" --port 1
    --device 0 --type hdd --medium <vdi>
The system also formats the new virtual storage, and creates a volume group cinder-volumes for cinder. It’s also worth to mention that, in order to keep the data separated for 2 deployed environment, two separated virtual storages have to be created for each environment.
2. Deployment environments
2.1 puppet
A VM puppetmaster is up with puppetdb installed. It pulls manifests from a configurable git repository to a directory inside the vm and use these manifests to deploy OpenStack on the other VMs. By default manifests in 4 is provided as an example to try out the new Icehouse release with ML2 plugin/l2 population. You can also provide your own manifests by configuring a puppet repository and which site.pp to use for the nodes definition:
    puppet_giturl: git@your.repository.git
    puppet_branch: your_branch
    puppet_site_pp: manifests/your_site.pp
2.2 devstack
I like the deployment whereby provisioning script is provided directly inside the vm. For this reason, puppet master for deployment devstack is not necessary. Insteads devstack is directly cloned and setup inside all VMs. It is also config to use the .pip repository of OpenStack [3]. Pydev is also included in the VMs for remote debugging from the host machine supported.
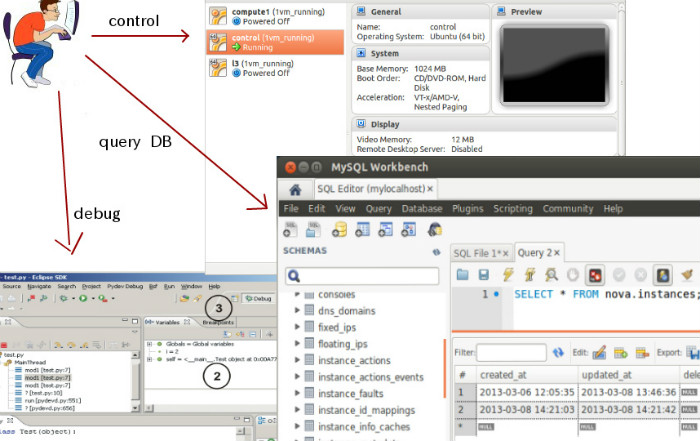 Figure 2: Remote debugging with MySQL Workbench & Eclipse
3. Performance boost
One issue is the long deployment time, especially if you have a slow connection or connection drops in the middle of the deployment. So I tried out all tiny possibilities to reduce the time consuming.
3.1 Caching
When a VM is destroy and up again, it must download all packages from scratch. A simple solution for caching is implemented which cuts the deployment time by half. It’s even more faster for a second deployment, since all packages and the glance image are cached for further use so internet access is not necessary.
Caching is supported for both environments: all .deb packages installed by puppet, as well as all .pip packages installed by devstack are cached and shared between VMs. The tables below just gives a clue how much time we can save for bringing up the machines with cache enabled with a pretty fast internet download speed (4Mbit/sec), each vm 1 cpu and 1024 ram.
a) Puppet deployment in secs
| Nodes | no cache | with cache |
|---|---|---|
| Control | 312 | 227 |
| Compute | 110 | 83 |
| Neutron | 109 | 62 |
| Total | 532 | 230 |
win 5 min
b) Devstack deployment in secs
| Nodes | no cache | with cache |
|---|---|---|
| Control | 764 | 655 |
| Compute | 764 | 341 |
| Neutron | 224 | 208 |
| Total | 1754 | 660 |
win 18 min
To test a custom package, simply replace it under the cache folder and bringing up new VMs.
3.2 Customize vagrant box
To reduce the vagrant up time, a vagrant box is customized with packages pre-installed. The box is based on precise64 with packages such as VBox Guest Additions 4.3.8, puppet, dnsmasq, r10k, vim, git, rubygems, msgpack, lvm2 pre-installed. The box is also zero out all empty spaces and white out all logs to have a minimum size as possible (378 Mb) to distribute on vagrant cloud. This again cuts down 70 secs for each vm up (from 79 secs to 8 secs).
win 4.6 min (4 VMs x 70 secs)